
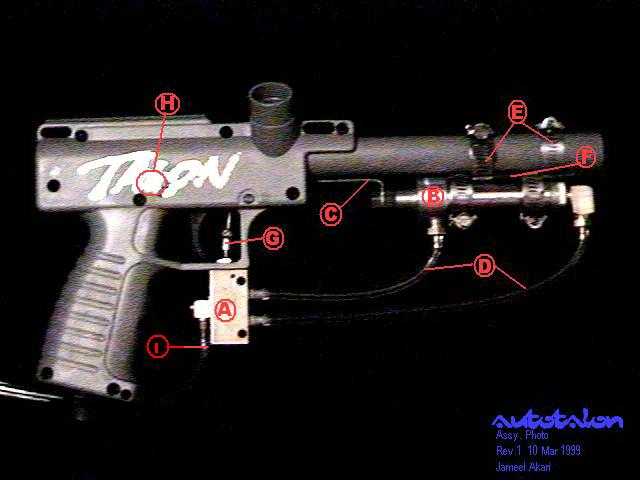
Parts Drawing
| Item |
Name |
Manufacturer/PN or description |
| A |
3-Way Valve |
Clippard MAV-4 |
| B |
Cylinder |
Bimba 041-D (041.5D would be better) |
| C |
Cocking Rod |
Largish wire coat hanger |
| D |
Cylinder Hoses |
Norton Tygon B-44-3 |
| E |
Mounting Clamps |
1-1/2" and 1-1/16" hose clamps |
| F |
Mounting Spacer |
3/8x1/8" steel bar stock |
| G |
Trigger Linkage |
Lever- coat hanger wire
Coupling- aluminum spacer tapped for a set screw. |
| H |
Firing Pin |
6-32x2" SS screw, a nylon spacer to fit over the screw and two T-nuts. |
| I |
Inlet Hose |
Tygon; this hose leads from a low-pressure regulator. |
Plus, some various hose fittings. The 3-way has 10-32 tapped ports, and the cylinder has 1/8 NPT ports.
Again, I apologize for the poor image quality. This picture will be replaced with a scanned photo as soon as possible.
How it's done
There isn't anything really special or critical about any of the parts or where to mount them. It's up to you. Between looking at the pictures and looking at the workings of a stock Talon, you can probably figure out what needs to happen. Here, in more detail, are the main modifications:
- There are almost no changes to the internals except for the
addition of the firing pin, which releases the hammer on the forward stroke. This is the only really critical placement. If the pin is too big or too small
or not in the right spot, the gun will either not cock, not release, or
jam half-way. A hint: it's easier to let the pin float around a little than to rigidly fix it to the body. I'll measure and list the position of the pin when I next get a chance to.
- You need to cut pieces out of the trigger to clear the pin, and somehow connect your 3-way valve to the trigger. As you see on the pictures, I've made a rod come straight down from the trigger arm to depress the 3-way. There are other ways to do this, but this is the easiest with the fewest possible parts.
- Make a cocking rod to connect the bolt to the pneumatic cylinder, then
fasten the cylinder to the outside of the gun. Make sure the rod is reasonably
straight. My arrangement is not the only way, and it's not the best way either. I'd rather mount the cylinder on the side or top of the body, but those approaches require special brackets to be made. But then you can link the cylinder to the bolt through the body with a pin, as in a Spyder, instead of a long cocking rod.
- Arrange the 3-way and cylinder hoses so that the gun cocks when
you pull the trigger, and pulls the bolt forward when you release the
trigger. Like an Autococker. Note that an Autococker ram is probably
too small to work on a Talon. You need one with at least 1" or
preferably 1 1/16+" of stroke and 1/2" diameter to move the bolt far
enough and work hard enough to compress the springs. This is why I recommend the #41.5D cylinder above, since it has more than enough travel to work.
- Connect a CO2 tank in place of the 12-grams. This requires an adapter of some sort. Cooper-T makes one, and apparently Brass Eagle has one as well. It helps if you get one with an additional NPT port on it to connect your low pressure regulator (see below.)
- You need a low-pressure regulator to drive the ram. The high
pressure side goes to your CO2 source, and the low pressure side to the
3-way input. Something like an Autococker LP regulator (a Sledgehammer or Rock, for example) is a safe bet here. Probably 50-60psi pressure to get it to work in both directions. Mine works intermittently below 45psi, and 55psi seems just right. Yours will likely vary.
I've been told an Autococker ram has enough stroke to work in theory, but it remains to be seen if it'll work at a reasonable pressure. At first look, the stock 'cocker ram seems to be a little small in diameter (bore), meaning it takes more gas pressure to exert the same force. This can be hard in the 3-way, hoses, and cylinder.
Go back to AutoTalon main page.
Modified on 21 Sep 1999